First impressions (product photography) are of huge significance for your Amazon, Shopify, or Etsy shops. You might be thinking high-quality pictures may need you to break the bank, but that is not true. All you need is a smartphone and some cheap materials to produce great results.
Below are 7 hacks to get product photography done cheaply. Every method is described in detail so you won't have to look any further for guidance.

1. Use Free AI Product Photos (Budget: $0-$16/Month)
If you don't want to edit at all, try Assembo.ai AI-generated realistic backgrounds. All you have to do is upload a product image and experience an AI photoshoot with a premium product photoshoot background.

Utilizing AI tools' free trials
Users can customize photos with AI Product Photos for clothes, shoes, and bags to boost social media sales and likes. AI-generated models and aesthetic product photoshoots are ideal for your Instagram and TikTok!
Assembo.ai has two packages with free trial: Basic and Pro. The basic package comes with lots of advantages including:
-
500 Fast Generation Images/month
-
HD resolution at 1024x1024
On the other hand, the Pro version offers features including:
-
Unlimited Image & Video/month (Limited Offer🔥)
-
Save all images on the cloud
-
Save all cropped product
-
VIP access to Fashion & Video App
-
Pro Editor & AI Magic Eraser
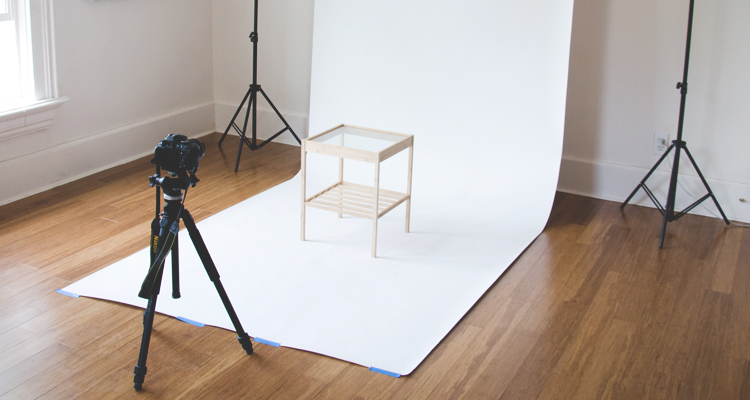
2. Try DIY Product Photography Setup (Budget: $20-$100)
It takes only 13 milliseconds for the human brain to process images. Great product photography is one way to achieve the best results. However, it won't require you to spend much money because DIY solutions can get it done cheaply.
Camera Options: Smartphones
Any smartphones produced in the recent 5 years are good options for great product photography. If you are really shooting for the best cameraphones, here are a few options:
-
Samsung Galaxy S24 Ultra
-
iPhone 15 Pro Max
-
Google Pixel 8 Pro
-
OnePlus 12
Affordable Stabilizing Stands
Next big thing after choosing a smartphone is an affordable stabilizing stand. We have done deep research to list out some of the affordable options available on the market:
Lighting Solutions: Clamp Lights Or Arqbox
It is the lighting that makes a huge difference in your photography, not just the camera. Below are some clamp light solutions.
-
Simple Day Light by the window
-
NEEWER Heavy Duty C Clamp with Mounting Column for Light Stand
White Backdrop Alternatives
Photography backgrounds are extremely important parts of photography. That is why choosing the right backdrop is crucial. Apart from the whole backdrop, you can choose:
-
Fabric - Canvas & Muslin
-
Paper rolls
-
Wooden boards
-
Duo boards
-
MDF sheets
3. Take advantage of Natural Light (Budget: $0)
There is no photography without light. Among lights, it is the natural light that can give a lot more than your expectations in photography.

Benefits Of Natural Light
Natural light has lots of benefits. If we sum up in a nutshell:
-
Natural light is a flattering source for skin tones.
-
Photography gets a taste of your natural home environment.
-
Photographers get complete control of viewpoints.
Finding The Best Naturally-lit Areas
There are several variables for this purpose. You may choose:
-
Gazebo or front porch with a roof
-
Under an umbrella
-
Near a window
-
Find a bridge or an overpass.
-
Anywhere at sunset
You can also find more naturally-lit areas. For instance, you can do this by creating your own overhead roof by having an assistant hold a light blocker above your subject similar to the way you use an umbrella.
Avoiding Direct Sunlight
You need to subtract your subject from the light and keep it in the shade. This will add more flavors to your photography. This may get you:
-
Illuminated face of the product.
-
Tones of the skin.
You may consider photography in the golden hours 1 hour after sunrise and 1 hour before sunset. An overcast sky can also give you beautiful indirect light.
4. Use Free Editing Essentials (Budget: $0-$10/month)
Aside from your photography talent, another magic ingredient for the wholesome process is photo editing. Using the right editing techniques can have a defining impact on your photos. The great thing about it is that it is easy and costs just a few bucks to achieve it.

White Balance And Exposure
The color balance of an image refers to White Balance (WB). Adjusting white balance settings is not difficult. You can do this by:
-
Adjust the white balance in the camera as most cameras have powerful automatic white balance (AWB) functions.
-
Shoot in the RAW file format.
-
Aim for consistent lighting.
-
Use a gray card to be precise, specifically shaded at 18 percent gray.
Cropping And Straightening
The next important part of the process is chopping and straightening your image. You can do this by using Photoshop. In the Photoshop:
-
Select the Crop tool in the Tools panel and a crop border will appear.
-
Adjust the size and shape of the crop border by dragging any edge or corner.
-
Position the image inside the crop border by dragging it inside the crop border.
-
Rotate or straighten by dragging outside a corner of the crop border.
-
Complete the crop by clicking on the checkmark in the options bar or press Enter (Windows) or Return (macOS).
Cheap Phone Editing App For Maintaining Consistent Editing Style
You can maintain a consistent editing style by choosing a cheap phone editing app. You may choose from:
-
Snapspeed
-
Camera MX
-
Photoshop Fix
-
Afterlight
5. Repurpose Household Items (Budget: $0-$10)
Simply look around your home for inspiration or items, and see how you feel about getting creative on a photoshoot. We already have lots of tools under our noses for creating incredible images.

Using Bed Sheets Or Tablecloths As Backdrops
This is an interesting approach to using bed sheets or tablecloths as backdrops. Most often, these pieces have a multitude of colors that can give you an extra edge on dropping a promising background without costing even a penny.
Repurposing Scrap Wood Or Foam Board For Stands
This may cost you a few bucks but scrap wood or foam board for stands truly work. They give a transparent background as well as a more natural look. Anyone can become more inventive about these items in their own creative ways.
Incorporating Plants, Fruits, Or Other Items For Styling
We see lots of product photographs with plants, fruits, or other items for styling. They offer you the closest possible relation to nature. You can style them as you wish to look background.
6. Batch create photoshoot (Budget: $0)
Batch photoshooting is a great way to get more physically creative things done at once. This saves you from lots of collections, dispersion, arrangements, etc. of different items linked to your product photography.
Planning And Organizing Product Shoots In Batches
Planning is the primary step for a batch photoshoot. Get all the products organized. Gather all the materials for the background and other purposes, research answers to any burning questions, and make sure everyone and everything is on board. It doesn't need you to be a super-technical project management solution or fancy photo editing app. Create a list of everything you need for the photoshootHere is the continuation of the code with the remaining article content and Pexels stock image URLs:
and keep it with yourself.
Maximizing Time And Resources
Batching works best for photographers. You can do a batch photoshoot and then conveniently do everything while sitting wherever you want. This gives you enough time to look into more creative resources like websites, apps, etc. that can help you make any further adjustments calmly.
Maintaining Consistency Across Products
Another good thing about batch photoshoots is maintaining consistency across products. When you have photographs of all the products, all you have to do is make changes one after the other. It keeps you organized in doing the software stuff. You can consistently make changes, upload images, etc.
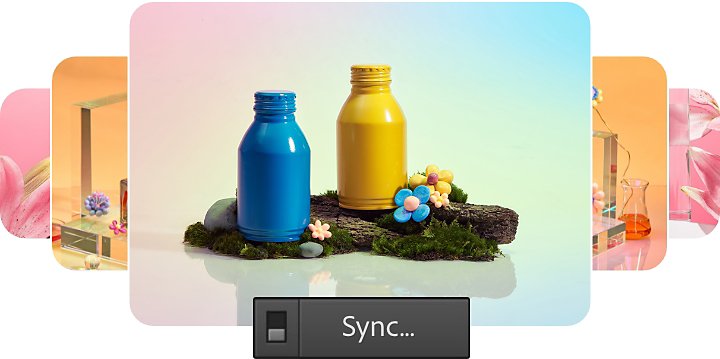
Use Assembo.ai Pro to Batch Create Photos
If you don't have much time or don't want to edit on your own, Assembo.ai can help you batch create for generating photos. It takes a minute to create images according to the provided prompt!
7. Have fun with Natural Props And Textures (Budget: $0-$10)
Incorporating natural props and textures into your product photos can add depth, interest, and context without costing a fortune. Natural props and textures

Ideas For Natural Props And Textures:
-
Flowers, leaves, and branches from your garden or local park
-
Fruits, vegetables, or other food items that complement your product
-
Wooden boards, planks, or crates for rustic backgrounds
-
Fabric scraps, lace, or burlap for added texture
By utilizing natural props and textures, you can create visually appealing and engaging product photos without spending a lot of money on artificial decorations.
Final Thoughts
We discussed 7 hacks to get product photography done cheaply. The best thing about these hacks is that you don't have to break the bank but rather anything within $50 will do the whole process for you. Furthermore, purchased and readily available household stuff can help you in the long term without costing much!