
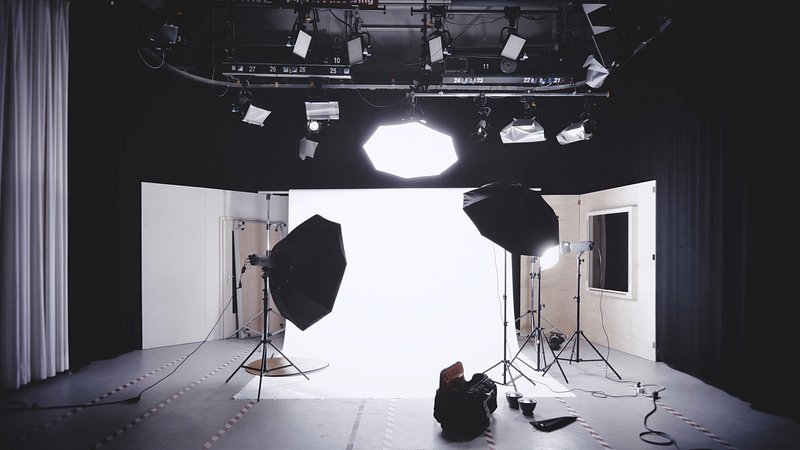
Setting up lighting for product photography can make or break your images. No matter if you're shooting for an e-commerce store or a creative project, the right lighting setup is key to showcasing your products. Poor lighting can lead to dull, unappealing photos, while proper lighting can highlight textures, colors, and details. In this guide, we’ll dig in to the top 10 tips for setting up lighting for product photography, including natural light tricks, studio setups, and how to use reflectors for balanced shots.
1. Use Natural Light for Soft Illumination
Natural light is a great starting point for setting up lighting for product photography. It’s free, easy to use, and creates soft, even lighting.
- Key tips for natural light:
- Shoot near a large window with indirect sunlight.
- Avoid harsh midday sun—early morning or late afternoon light works best.
- Use a white foam board as a reflector to fill in shadows.
For more tips, check out how to utilize natural light.

2. Use Assembo.ai to Create Custom Backgrounds
Assembo.ai is a powerful tool for setting up lighting for product photography virtually. Upload your product and experiment with different lighting effects before your shoot.
- How it helps:
- Simulate studio lighting setups without physical equipment.
- Test how shadows and highlights will look on your product.
- Save time by planning your shoot digitally first.
Learn more about Assembo.ai’s features.

3. Try a Two-Light Setup for Balanced Shots
A two-light setup is a simple yet effective way to level up your product photography. One light acts as the main source, while the other fills in shadows.
- How to set it up:
- Place the main light at a 45-degree angle to the product.
- Use a softer light or reflector on the opposite side to reduce shadows.
- Adjust the distance of each light to control intensity.
See more on two-light setups.

4. Use Reflectors to Soften Shadows
Reflectors are an affordable way to improve your lighting setup for product photography. They bounce light back onto your product, reducing harsh shadows.
- Types of reflectors:
- White foam boards for soft, diffused light.
- Silver reflectors for brighter, more direct light.
- Black cards to add depth by blocking light.
For DIY reflector ideas, visit this Reddit thread.

5. Use Backlighting for Transparent Products
Backlighting is perfect for setting up lighting for product photography when shooting glass or liquids. It creates a glowing effect that highlights transparency.
- How to do it:
- Place a light source directly behind the product.
- Use a diffuser to soften the light.
- Adjust the angle to avoid lens flare.
Learn more about backlighting techniques.

6. Try Overhead Lighting for Flat Lay Shots
Overhead lighting works well for flat lay product photography. It provides even illumination and minimizes shadows.
- Setup tips:
- Use a softbox or LED panel above the product.
- Keep the light at a 90-degree angle to the surface.
- Use a tripod to keep your camera steady.
For inspiration, check out overhead lighting examples.

7. Soften Light with Diffusers
Diffusers help in setting up lighting for product photography by spreading light evenly. They prevent harsh highlights and create a professional look.
- Types of diffusers:
- Softboxes for studio lights.
- Umbrellas for portable setups.
- DIY options like white fabric or parchment paper.
See how diffusers improve product photos.
8. Highlight Texture with Side Lighting
Side lighting is great for setting up lighting for product photography when you want to emphasize textures like fabric or wood grain.
- How to position side lights:
- Place the light at a 90-degree angle to the camera.
- Adjust the height to control shadow length.
- Use a fill light if shadows are too dark.
Learn more about side lighting techniques.
9. Use a Ring Light for Small Products
Ring lights provide even, shadow-free illumination, making them ideal for setting up lighting for product photography with small items like jewelry.
- Benefits of ring lights:
- Creates a circular catchlight in reflective surfaces.
- Provides uniform lighting from all angles.
- Works well for macro photography.
Find the best ring lights here.
10. Master the Three-Point Lighting Setup
The three-point lighting setup is a professional technique for setting up lighting for product photography. It uses a key light, fill light, and backlight for depth.
- How to arrange it:
- Key light: The main light at a 45-degree angle.
- Fill light: Softer light on the opposite side.
- Backlight: Separates the product from the background.
For a detailed guide, read three-point lighting explained.
Final Thoughts
Setting up lighting for product photography doesn’t have to be complicated. Start with natural light or a simple two-light setup, then experiment with reflectors and diffusers. No matter if you're shooting for an online store or a creative project, these tips will help you capture stunning product images. Try different angles and lighting positions to see what works best for your products.