
Creating a professional product photography kit doesn't have to cost thousands of dollars. A good product photography kit can help you capture beautiful images that make your products stand out. Your product photography kit should include key items that work together to create clean, well-lit photos. Building the right product photography kit takes some planning, but it's worth the investment. This complete product photography kit guide will show you exactly what you need.
No matter if you're just starting out or looking to level up your current setup, these twelve product photography kit essentials will give you everything needed for professional results. Let's dig in to what makes a great product photography kit.

1. Choose the Right Camera for Your Product Photography Kit
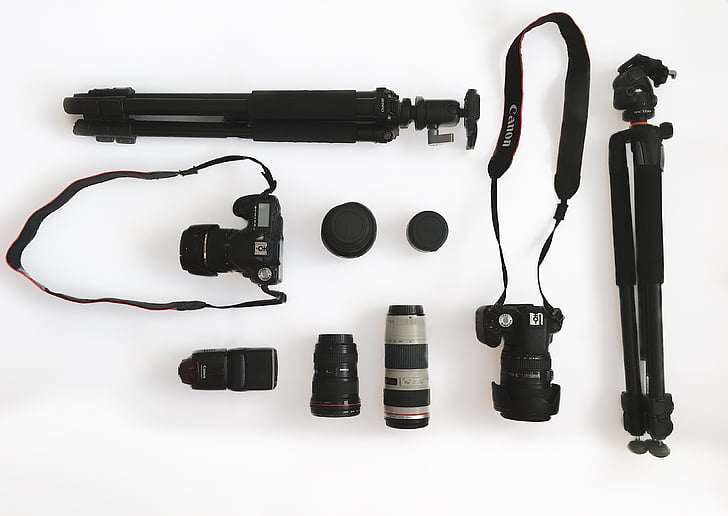
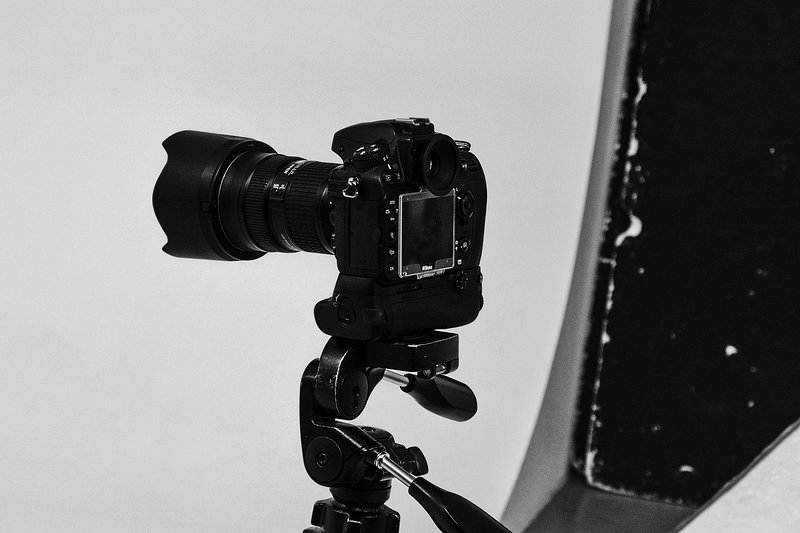
Your camera is the most important part of your product photography kit. While smartphone cameras have improved, a DSLR or mirrorless camera gives you more control over settings and image quality.
- Camera selection tips:
- Look for cameras with manual controls for aperture, shutter speed, and ISO
- Consider a camera with a flip screen for shooting at odd angles
- Check compatibility with different lenses before buying
For camera recommendations, see this detailed equipment guide.
2. Select the Best Lenses for Your Product Photography Kit
Lenses can make a bigger difference than your camera body in product photography. The right lens helps you capture sharp, detailed images with beautiful background blur.
- Important lens types:
- 50mm prime lens - perfect for general product shots and flatlays
- 100mm macro lens - ideal for small items like jewelry
- 24-70mm zoom lens - versatile for different product sizes
Learn about lens options from professional photographers.
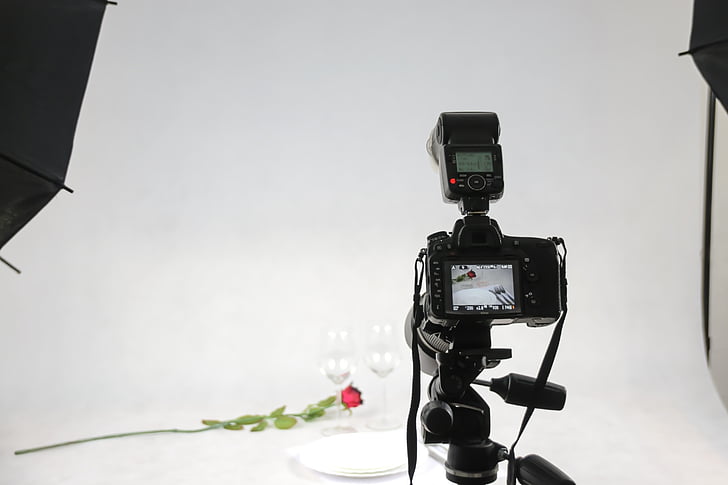
3. Set Up Proper Lighting for Your Product Photography Kit
Lighting is key for professional-looking product photos. Good lighting eliminates harsh shadows and shows your products in their best light.
- Lighting options:
- Natural daylight - free but inconsistent
- Continuous lights - affordable and easy to use
- Studio strobe lights - professional quality but more expensive
Find complete lighting kits that include everything you need.

4. Include a Sturdy Tripod in Your Product Photography Kit
A tripod keeps your camera steady and ensures consistent framing across all your product photos. It also lets you use slower shutter speeds without blur.
- Tripod benefits:
- Eliminates camera shake for sharper images
- Allows consistent composition across multiple shots
- Frees your hands for adjusting products and props
Browse tripod options and accessories for different shooting needs.
5. Collect Versatile Backgrounds for Your Product Photography Kit
Backgrounds set the stage for your products. Having multiple background options lets you create different moods and styles for your product photos.
- Background ideas:
- Seamless paper rolls in neutral colors
- Textured surfaces like wood or concrete
- Fabric backdrops for soft, professional looks
Check out affordable background kits with multiple pattern options.

6. Add a Light Tent to Your Product Photography Kit
Light tents create soft, even lighting by diffusing light sources. They're especially helpful for photographing reflective products like jewelry and metal items.
- Light tent advantages:
- Creates soft, shadow-free lighting
- Reduces harsh reflections on shiny products
- Provides consistent lighting conditions
Learn about light tent systems designed for tabletop product photography.

7. Use Reflectors and Diffusers in Your Product Photography Kit
Reflectors bounce light onto your products to fill in shadows, while diffusers soften harsh light sources for more flattering illumination.
- How to use them:
- White reflectors for soft fill light
- Silver reflectors for brighter fill light
- Diffusers to soften direct sunlight or artificial light
See how professional photographers use reflectors in their product shoots.
8. Gather Props and Styling Tools for Your Product Photography Kit
Props help tell a story about your products and create context. Simple styling tools can help position products exactly how you want them.
- Useful props and tools:
- Prop wax or museum putty for positioning small items
- Clear fishing wire for "floating" products
- Natural elements like plants or textiles
Get ideas for prop selection and styling from experienced photographers.
9. Create a Tabletop Studio for Your Product Photography Kit
A dedicated tabletop studio gives you a consistent space for shooting small to medium products. It doesn't require much space but makes setup faster.
- Tabletop studio elements:
- Stable table or platform
- Adjustable background support
- Space for lights and reflectors
Explore tabletop photography solutions designed for product photographers.

10. Include Essential Accessories in Your Product Photography Kit
Small accessories can make big differences in your workflow and final results. These extras help you work more efficiently and protect your equipment.
- Key accessories:
- Remote shutter release to prevent camera shake
- Lens filters for protection and special effects
- Cleaning supplies for lenses and products
Find photography accessories and grips to complete your kit.

11. Organize and Store Your Product Photography Kit
Proper storage keeps your equipment safe and makes setup faster. Having an organized system means you can start shooting quickly when inspiration strikes.
- Storage solutions:
- Protective cases for cameras and lenses
- Background storage tubes or rolls
- Labeled containers for small accessories
See how photography professionals organize their gear for efficient workflows.
12. Build a Budget-Friendly Product Photography Kit
You don't need to spend a fortune to create a functional product photography kit. Many household items can work as substitutes for professional equipment.
- Budget alternatives:
- White foam board instead of professional reflectors
- Natural window light instead of expensive studio lights
- DIY backgrounds using painted boards or fabric
Discover budget photography tools and tips for small businesses.
Final Thoughts
Building a complete product photography kit takes time and planning, but it's an investment that pays off in better product images. Start with the basics like a good camera, tripod, and simple lighting, then add specialized equipment as your needs grow. Remember that the best product photography kit is one that you'll actually use regularly.
No matter if you're photographing jewelry, clothing, or household items, having the right equipment makes the process smoother and the results more professional. Your product photography kit should evolve as your skills and business grow.